Introduction
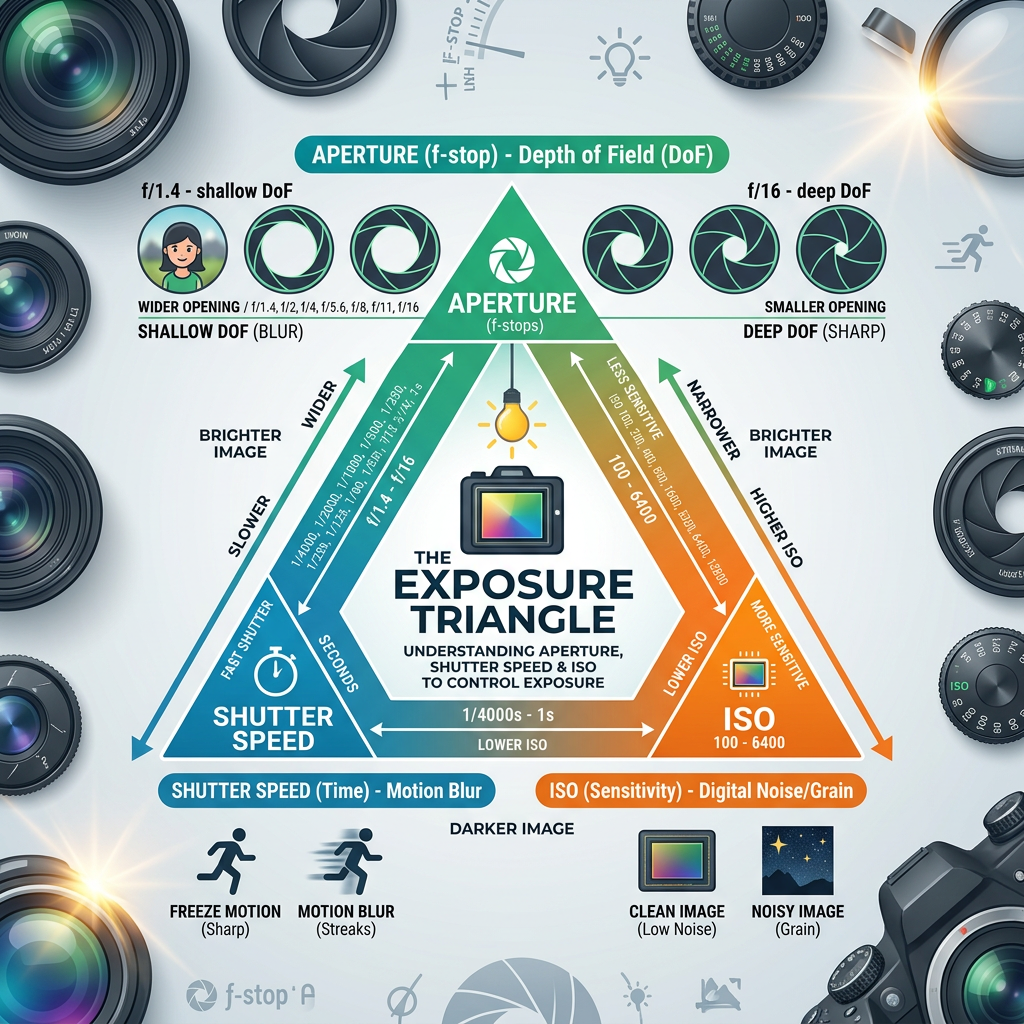
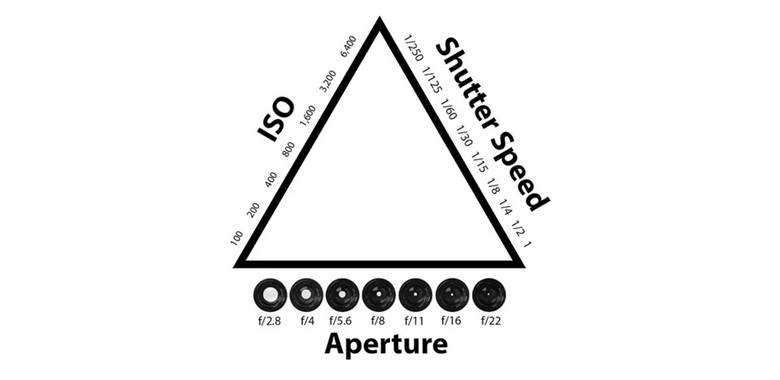
The Exposure Triangle is the foundation of exposure control in photography. It consists of Aperture, Shutter Speed, and ISO. These three settings work together: change one and you must adjust one or both of the others to keep the same overall exposure. Understanding how they interact gives you creative control over brightness, motion, and depth of field.
The three sides of the triangle
Aperture
- What it is: The size of the lens opening that lets light reach the sensor.
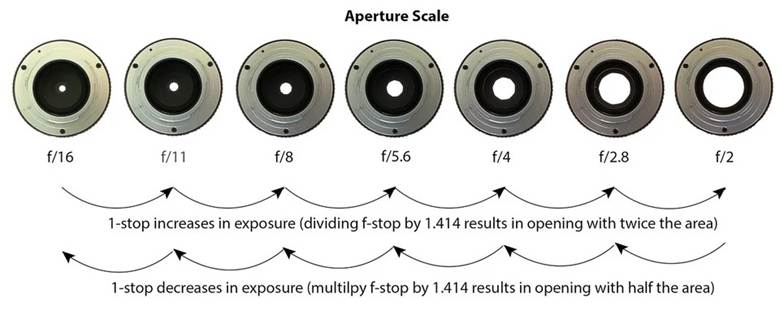
- How it’s measured: f‑stops (e.g., f/2.8, f/5.6, f/11).
- Effect: Lower f‑number = larger opening = more light and shallower depth of field (blurry background). Higher f‑number = smaller opening = less light and greater depth of field (more of the scene in focus).
Shutter Speed
- What it is: How long the shutter stays open, measured in seconds or fractions (e.g., 1/125, 1/30, 1″).
- Effect: Longer exposures = more light and more motion blur. Faster exposures = less light and freeze motion.
ISO
- What it is: The sensor’s sensitivity to light.
- Effect: Higher ISO = brighter image but more noise/grain. Lower ISO = cleaner image but requires more light.
Stops of light — the balancing unit
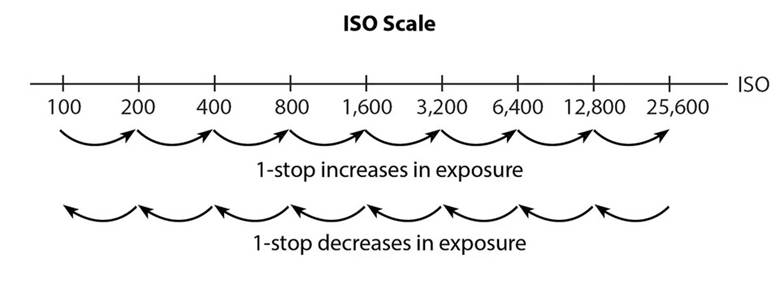
A stop is a doubling or halving of light. Changing any one of the three settings by one stop requires compensating with one or more of the others by one stop to keep exposure constant. Examples of one-stop changes:
- Aperture: f/4 → f/2.8 (one stop more light) or f/4 → f/5.6 (one stop less light).
- Shutter: 1/125 → 1/60 (one stop more light) or 1/125 → 1/250 (one stop less light).
- ISO: 200 → 400 (one stop more light) or 200 → 100 (one stop less light).
Quick reference table (common equivalent exposures)
| ISO | Aperture (f‑stop) | Shutter Speed |
| 6400 | f/2.8 | 1/8 |
| 3200 | f/4 | 1/15 |
| 1600 | f/5.6 | 1/30 |
| 800 | f/8 | 1/60 |
| 400 | f/11 | 1/125 |
| 200 | f/16 | 1/250 |
| 100 | f/22 | 1/500 |
How to read the table: Each row is roughly one exposure value (EV) apart. Moving up a row doubles light; moving down halves it.
Practical tips and creative choices
- Portraits: Use a wide aperture (low f‑number) for subject separation; keep shutter fast enough to avoid camera shake; use the lowest ISO that gives correct exposure.
- Landscapes: Use a small aperture (high f‑number) for deep depth of field; use a tripod if shutter speed becomes slow; keep ISO low for best image quality.
- Action / Sports: Use fast shutter speeds to freeze motion; open aperture and/or raise ISO to compensate.
- Low light / Night: Raise ISO and use wider apertures; use a tripod for long exposures to avoid camera shake and blur.
Simple practice exercise
- Set your camera to Manual (M).
- Choose a subject and a focal length.
- Start with ISO 100, f/8, 1/60. Take a shot.
- Change one setting by one stop (e.g., f/8 → f/5.6). Compensate by changing shutter or ISO by one stop to keep exposure similar.
- Repeat across the table rows and observe changes in depth of field, motion blur, and noise.
Short FAQ
- Q: Which setting should I change first?
A: It depends on your creative goal: change aperture for depth of field, shutter for motion, ISO for low‑light sensitivity. - Q: Is higher ISO always bad?
A: Higher ISO introduces noise, but modern cameras handle high ISO much better. Use the lowest ISO that lets you achieve your creative goals. - Q: What about auto modes?
A: Auto modes are useful, but learning Manual or Aperture/Shutter Priority gives you full creative control.
Conclusion
Mastering the Exposure Triangle unlocks creative control over your images. Practice deliberately: change one variable at a time, note the visual effect, and learn which combinations match your vision. Print the reference table, run the practice exercise, and you’ll see steady improvement.
Print this chart and change your settings to each to see the difference for yourself. You can do this test in your own home as well which I suggest as a good starting point for new photographers. Get to know your camera, how to change settings and test each of these variables. Find a subject and start practicing.
I hope you found this article useful and that you learned something. Did you like it, not like it or maybe have questions? Let me know in the comments and I’ll be sure to get back with you as soon as I can.