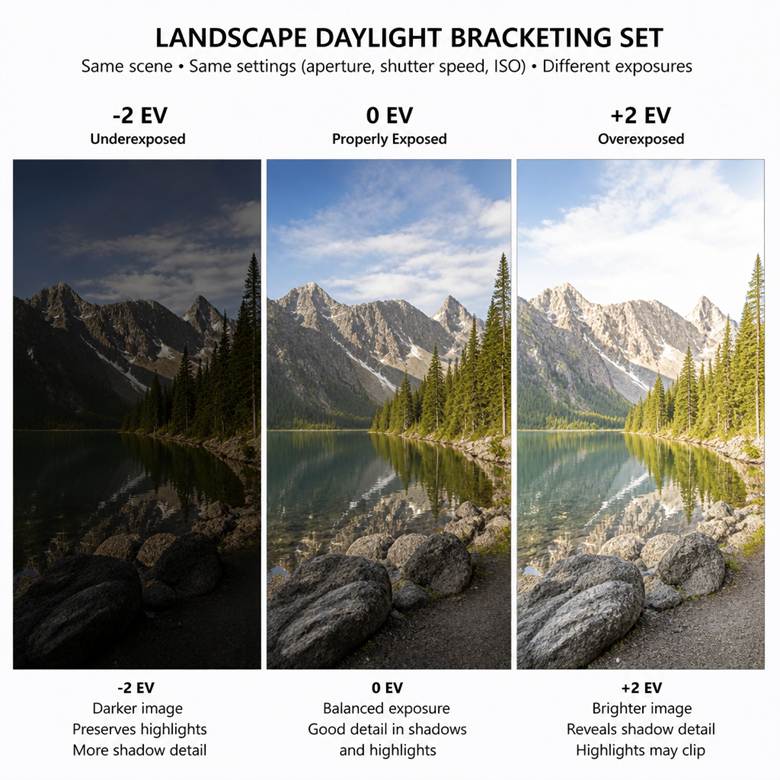
Exposure bracketing is taking several shots of the same scene at different exposures so you can choose the best frame or merge them into an HDR image; use AEB with ±1–2 EV steps, shoot RAW, and use a tripod for best results.
What exposure bracketing is and why it matters
Exposure bracketing means capturing a series of images of the same scene at different exposure values (for example: 0, −1 EV, +1 EV) so you preserve highlight and shadow detail that a single exposure might lose.
When to use it: high‑contrast scenes (sunsets, backlit subjects, interiors with bright windows), tricky metering, or when you plan to create an HDR merge in post.
How to set up exposure bracketing (step‑by‑step)
1. Camera mode and AEB
- Use Aperture Priority (A/Av) to keep depth of field constant, or Manual (M) if you want full control.
- Enable Automatic Exposure Bracketing (AEB) on your camera and choose the number of frames and step size (commonly 3 frames at ±1 EV or 5 frames at ±2 EV).
2. Recommended settings
- Bracket range: start with 3 frames at ±1 EV for modest dynamic range; use 5 frames at ±2 EV for very high contrast scenes.
- Shoot RAW to retain maximum tonal information for blending or HDR merging.
- Use a tripod and remote release to keep frames perfectly aligned; if handheld, enable in‑camera stabilization and faster shutter speeds.
3. Exposure control choices
- Most cameras vary shutter speed for AEB in Aperture Priority; in Manual mode you can vary ISO or shutter to create the bracket. Choose the parameter that won’t change depth of field.
Post‑processing: pick or merge
- Pick the best single exposure when one frame already contains the desired detail and mood.
- Merge to HDR when highlights and shadows both need detail; software like Lightroom, Photoshop, or dedicated HDR tools will align and blend bracketed frames.
Practical tips and trade‑offs
- Speed vs. quality: bracketing takes time and storage; for fast action, bracketing may cause motion artifacts.
- Ghosting and movement: moving subjects can create ghosting in HDR merges; use deghosting tools or mask manually.
- Overuse risk: HDR can look unnatural if over‑processed—aim for subtlety and preserve contrast where it matters.
Quick checklist before you shoot
- AEB enabled and step size set.
- RAW format selected.
- Tripod/remote ready for static scenes.
- 3–5 frames depending on dynamic range.
Quick answer: Capture a tight exposure bracket (3–5 RAW frames, ±1–2 EV), import into Lightroom, use Photo Merge > HDR with Auto Align and Deghosting, save the merged DNG, then finish with targeted local adjustments and graduated masks for sky and foreground.
Workflow Overview
- Choose bracket and capture strategy
For landscapes, 3 frames at ±1–2 EV is a reliable starting point; increase to 5 frames for extreme contrast (sunrise/sunset with deep shadows). Shoot RAW and use a tripod plus remote release when possible to minimize alignment issues.

Lightroom HDR Merge Step‑by‑Step
2. Import and select
Import your bracketed RAW files into Lightroom and select the full sequence you want to merge.
3. Photo Merge to HDR
Go to Photo > Photo Merge > HDR (or Ctrl/Cmd+H). In the HDR Merge Preview: enable Auto Align (handheld or slight tripod movement) and enable Auto Tone if you want Lightroom to give a neutral starting point. Use Deghosting to reduce movement artifacts from foliage, water, or people; choose the level that best removes ghosts without introducing halos.
4. Create and inspect the merged DNG
Lightroom saves the result as a DNG with an extended exposure slider range and more recoverable data. Inspect the merged file at 100% for alignment, noise, and ghosting. If alignment or ghosting is unacceptable, try re-merging with different source frames (drop the middle exposure if total separation is small) or use manual masking later.
Final Develop Pass for Landscapes
5. Global adjustments
Start with Exposure, Contrast, Highlights, and Shadows to set the overall balance. The merged DNG gives extra headroom for recovering highlights and lifting shadows.
6. Local adjustments
Use Graduated Filters or Range Masks to separately treat sky and foreground; apply Radial Filters for sun glows or vignette control. Use Targeted Adjustment and HSL to refine color in skies and foliage.
7. Noise and sharpening
Apply noise reduction selectively (shadows often need more NR) and sharpen at the end, masking to protect smooth areas like skies.
Final image after HDR merge and editing.

Decision Points, Risks, and Tips
- When to merge vs. pick one frame: If a single RAW frame contains the look you want, skip HDR to avoid unnatural results. Lightroom’s HDR is best when highlights and shadows both need detail.
- Ghosting risk: Moving elements (trees, water, people) can create artifacts; use Deghosting or manual layer masking in Photoshop if Lightroom’s options aren’t enough.
- File count tradeoff: More frames can improve dynamic range but increase processing time and alignment risk; follow Adobe’s guidance on optimal frame counts for total stop separation.
Quick Checklist
- RAW files selected; 3–5 frames at ±1–2 EV.
- Auto Align and appropriate Deghosting enabled.
- Save merged DNG, then perform global then local edits.
Did you find this information useful? Let me know in the comments below. Also, be sure to rate this article.